Intro to HCI Lecture 2 – Prototyping
These are my notes in essay form from the Intro to Human Computer Interaction course taught by Scott Klemmer at the University of California, San Diego.

These are my notes in essay form from the Intro to Human Computer Interaction course taught by Scott Klemmer at the University of California, San Diego. All credit for content goes to Scott, any errors are my own.
After you’ve done the interviews and generated personas, the next step is to begin developing prototype solutions for the problem you are trying to solve. As a note to the development process, the fidelity of your work will increase as you get further along in the development process. Be careful to choose the tools that are most appropriate for the stage you are developing to avoid wasting time.
Based upon your needfinding, you should have been able to identify a couple key problems that your users are having, which should allow you to generate a point of view on the problem at hand.
For example, a point of view may be “waiting in line is intrinsic, but the boredom is not”. This would lead to design solutions like showing news or playing games while waiting in line. Alternatively, your point of view might be “with a good scheduling interface, no one should have to wait in line.” This might lead to better ways for employees to staff registers and consumers to pick them. Or, you might have a totally different point of view: “let’s make grocery stores more like farmers’ markets, where payment is distributed across the stands that have the food.”
Brainstorming Ideas
The biggest challenge in developing solutions that solves these problems is that we all have blinders that keep us from discovering the best solution. The greatest ideas are achieved by transcending the blinders and thinking outside the box.
There are two good examples of this. The first one is the classic problem of connecting all the dots in a three by three dot matrix by only drawing four lines.

If you think inside the box, as most people do, you’ll never find the solution to this problem. But by thinking outside of the box, you discover that by extending lines outside of the grid you are able to achieve the goal.

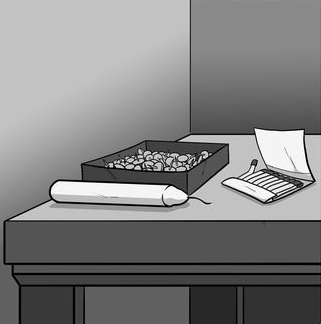
The second example is another classic riddle known as Duncker’s candle problem. Based on the items in this picture, (candle and a box of thumbtacks) how do you fix the candle to the wall without the wax dripping onto the table?
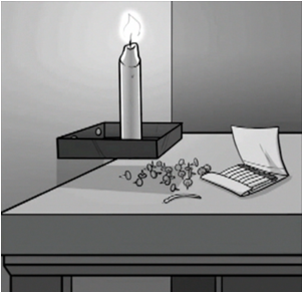
There are a lot of creative answers to this riddle, but by thinking outside the box and thinking about the box as a tool that can help you achieve your goal, you realize that you can do this:
In order to think outside of the box, we often have to brainstorm as many prototypes as possible in order to find the best ones. In this stage of the development process, developing a large quantity of prototypes rather than developing the quality of the prototype increases your chances of success down the line.
You’ll usually be able to think of the first couple solutions quickly and without much effort, but it is often the combination of multiple ideas that allows for the emergence of the best idea. Don’t stop after you think you’ve found a good solution, brainstorm solutions until you have absolutely exhausted your ability to come up with more.
If you find yourself unable to think of out of the box ideas, framing the problem in a different way or thinking about it from a different angle often helps. For instance, In the candle problem, when the problem is presented with the box being a separate object than simply a container for the thumbtacks, participants are able to come up with the solution more consistently.
As an experiment in an art class, the teacher divided her students into two groups. The first group was told that they would be evaluated on how many pieces of art they were able to produce, while the second group was told that they would be evaluated by the quality of the best piece of art they made.
“While the quantity group was busily churning out piles of work- and learning from their mistakes- the quality group had sat theorizing about perfection, and in the end had little more to show for their efforts tan grandiose theories and a pile of dead clay”
Thus, the question when it comes to prototyping is how can we consistently and reliably get people outside the frame? What are the subtle differences in framing that make big differences?
One strategy for thinking outside the box, as illustrated in the art class example, is to encourage people to design and build in parallel rather than in serial. By producing a large number of prototypes, we are able to separate ego from artifact, as well as encouraging comparison and transfer. Designers are less likely to get attached to one specific approach that may blind them from seeing a better solution.
With the recent advent of web analytics, we have been able to more finely track the engagement and success of advertisements. When comparing ads done in parallel versus ads done in serial, developing and sharing multiple design leads to more individual exploration, more feature sharing, more conversational turns, better consensus, and an increase in group rapport.
Additionally, what the web analytics revealed was that ads that were designed with a parallel approach got more visitors and engagement than ads designed in serial. In fact, ads that were developed in parallel generated longer time on site, was more diverse, and was clicked on more frequently.
Storyboarding
To begin developing prototypes to solve problems, it often helps to create storyboards. Storyboarding allows you to think about a problem from the perspective of the personas that you’ve created, enabling you to look outside of the box and think about and share the pain points that your users go through.
In essence, storyboarding is all about tasks. Like developing personas, it helps to have a story created from each demographic of users. By developing stories and envisioning how your solution would fit into the everyday tasks of your users, developing prototypes becomes much more clear. The holistic focus allows you to emphasize how a user interface accomplishes a task without committing to a specific user interface.
Much like a comic strip, storyboards also communicate flow. Good storyboards clearly show the flow between different steps of a task to help get all the stakeholders on the same page in terms of the goal.

One of the common remarks people make about storyboards is that they are unskilled at drawing. However, storyboards aren’t about how well you can draw. Storyboards are about communicating the underlying ideas of what users go through to accomplish a task. In fact, bad drawings often allow you to focus solely on the ideas.
Ultimately, storyboards should convey:
- Setting – Who are the people involved, what is the environment like, and what is the task being accomplished?
- Sequence – What steps are involved, what leads someone to use the app, and what task is being illustrated?
- Satisfaction – What motivates people to use this system, what does it enable people to accomplish, and what need does the system fill?
Paper Prototypes
The goal for building prototypes, as mentioned previously, is not about building the most aesthetically pleasing prototype, but building something that expresses the functionality and approach of your solution.
In terms of software applications, prototyping can be done without writing a single line of code. We can fake a product to make more prototypes in a short amount of time.
By prototyping your user interfaces with paper, you can easily show other people what your design could potentially look and feel like. Paper prototypes are also easily manipulated and changed, making it easy to receive feedback on your ideas.
When making paper prototypes, be creative and use different kinds of tools and resources to build your prototype. For example, you may use post it notes to simulate the effects of a popup window, or a menu that overlays on top of the interface. Another helpful hint is to use a photocopier to quickly duplicate different elements of your prototype.
Good paper prototyping is kind of like playing make believe as a kid. Using different sizes of paper, color, transparencies, index cards, and whatever else you can work with cheaply and quickly, you can convey almost any idea to other people.
The other advantage of paper prototypes is that they are easy to edit. Anyone with a pen can quickly make a change to how the prototype looks or how it works, making it easy to get other people’s ideas into the system and empowers them to play a more active role in the design process.
Video Prototypes
Another approach to further showcasing a storyboard is to create video prototypes. Video prototypes allow for a cheap, quick, and powerful visualization of how an idea is supposed to work. By sharing a story through a video that captures how the product is supposed to work, stakeholders can better visualize and understand how a solution could work. A video prototype can change what the team argues about in a good way.
Like good storyboards, video prototypes share a story in a self-explanatory, portable way. Good video prototypes show a whole task, including motivation and success. A good way to do this is to show the pain points, frustrations, as well as the success of a person executing on a task.
When creating a video prototype of any fidelity, ensure that you focus on the message rather than the quality of the video. You don’t need a high quality video camera in order to capture a video prototype, any smartphone will do. Make sure you create a realistic scenario that people can understand. Try not to spend too much time editing your video prototype because editing can be extremely time consuming.
The Wizard of Oz
If you’ve ever watched the Wizard of Oz, you’re likely to be familiar with the story of how the group (Dorothy, the Scarecrow, the Tin Man, and the Lion) traveled their long journey in hopes of meeting magical wizard. When they finally get to the castle, they discover that the giant wizard is nothing more than a small man controlling a large puppet.
In the same way when building prototypes, early prototypes can simply be a human operated mirage to simulate the interface to the users. This approach is much faster, cheaper, and more iterative while also being more real than paper prototypes.
One example can be seen in the way that a startup company named Aardvark demonstrated their concept to their users. Aardvark was an application that allowed a user to ask a question and be automatically paired up with one of their friends who was most qualified to answer the question. However, their prototype did not have the matching algorithm implemented yet, so they used a “wizard” to manually select who the question would be sent to.
If the users loved the wizard of oz prototype, they’ll love the real thing even more. However, there are a couple caveats to pay attention to when testing with a wizard of oz prototype. The higher fidelity the prototype is, the more users will think it is completed, and the less likely users will feel to offer critiques. On the contrary, lower fidelity prototypes will often generate more feedback, but may not capture the exact interaction you are looking for.
Additionally, to make a wizard of oz prototype, the “wizard” must understand the flow of the application in order to properly manipulate the application. Thus, the application flow must be carefully laid out and rehearsed in order to avoid errors in the demonstration, maximize consistency, and lower the response time necessary to perform the “wizard” tasks. Having a flowchart to follow the triggers the wizard receives can help reduce errors.
Another thing to be aware of when creating wizard of oz prototypes is accidently prototyping a technology that doesn’t exist yet. Pay careful attention to what your prototypes do to ensure that you will in fact be able to build it when the time comes. You don’t want to promise something you can’t deliver!